
Whether you are a player stepping up to a new role, a parent trying to follow the action from the sidelines, or a coach planning your next team selection, understanding positions in rugby is the key to mastering the game.
Rugby Union is famous for being a sport for all shapes and sizes. Every role on the 15-player team requires a unique combination of strength, speed, stamina, and tactical awareness.
We thought it would be great to do a whistle-stop tour of each of the 15 positions and what they do!
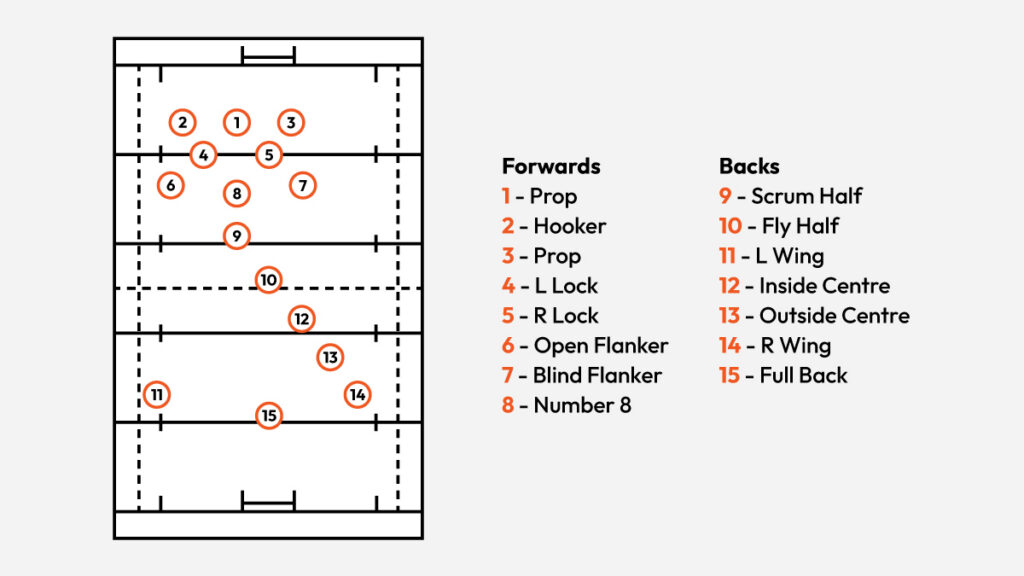
The Forwards (Numbers 1–8): The Engine Room
If you’ve ever wondered what the positions in rugby are and who does the heavy work, look no further than the pack. The rugby forward positions are your team’s powerhouse. Their primary job is to secure possession, win set-pieces (scrums and lineouts), and gain hard-fought ground in physical contact.
1 & 3. Loosehead Prop & Tighthead Prop
The Role: Positioned on either side of the hooker in the front row of the scrum.
What They Do: Props anchor the scrum, power through heavy contact, and act as primary lifters in lineouts. The Tighthead (No. 3) takes the weight of both opposing front-rowers in scrums, making it one of the most demanding physical rugby playing positions in sport.
2. Hooker
The Role: Located in the middle of the front row.
What They Do: The hooker “hooks” the ball backwards with their feet when it’s fed into the scrum. They are also almost always responsible for throwing the ball accurately into lineout jumpers.
4 & 5. Second Row (Locks)
The Role: The tall powerhouses standing directly behind the front row in the scrum.
What They Do: Locks are the main target for lineout throws due to their height and jumping reach. In open play, they drive through rucks, make heavy tackles, and act as ball-carriers through the middle.
6 & 7. Blindside Flanker & Openside Flanker
The Role: Positioned on the outer sides of the scrum.
What They Do: Flankers are relentless workhorses. The Openside (No. 7) focuses on stealing the ball at the breakdown (the “jackal”). The Blindside (No. 6) is usually larger, focusing on big tackles and carrying near the breakdown.
8. Number Eight
The Role: Binds at the very back of the scrum.
What They Do: The link between the forwards and the backs. Number Eights provide explosive ball-carrying from the base of the scrum, support breakaways, and assist in defensive lineouts.
The Backs (Numbers 9–15): Speed, Skill & Strategy
While the pack wins the physical battle, the rugby back positions use space, tactical kicking, speed, and agility to carve open defences and score tries.
9. Scrum-Half
The Role: The general standing directly behind the scrum or breakdown.
What They Do: The primary communicator on the pitch. The scrum-half feeds the ball into the scrum, passes it out of rucks to the fly-half or forwards, and directs the tempo of the entire attack.
10. Fly-Half
The Role: The playmaker positioned just behind the scrum-half.
What They Do: Think of the fly-half as the team’s quarter-back. They make split-second decisions on whether to pass along the backline, kick for territory, or run into open space. They are also usually the team’s primary goal-kicker.
11 & 14. Left & Right Wings
The Role: Stationed wide on the outer edges of the pitch.
What They Do: Pure pace and finishing ability. Wings exploit open space created by the inside backs, finish off try-scoring opportunities in the corners, and defend against opponent kicks.
12 & 13. Inside Centre & Outside Centre
The Role: Positioned between the fly-half and the wings.
What They Do: Centres are the defensive anchors in the backline and key line-breakers in attack. The Inside Centre (No. 12) often acts as a second playmaker or crash-ball runner, while the Outside Centre (No. 13) uses footwork and timing to break through wide defensive channels.
15. Full-Back
The Role: The last line of defence, sweeping behind the main defensive line.
What They Do: Full-backs catch high kicks under pressure, clear territory with long-range kicking, and join the attacking line late to create extra-man overlaps on the wings.
Bringing the Positions Together
A successful team relies on seamless communication between the pack and the backline. When reviewing rugby positions and roles, the formula is clear: forwards win the battle, and backs convert that work into points.
Having rugby positions explained in clear terms helps young players understand how their individual contribution fits into the wider squad dynamic. When teams embark on a rugby tour or tournament, testing these positional combinations against unfamiliar opponents and different playing styles is where real squad magic happens!
Ready for 2027?
Got your players ready and raring for their next tour or tournament? Contact our sports tours team and explore your squads options – it’s time to put your players to the test!